
The Code Editor is where you will build your program to create your animation or game.
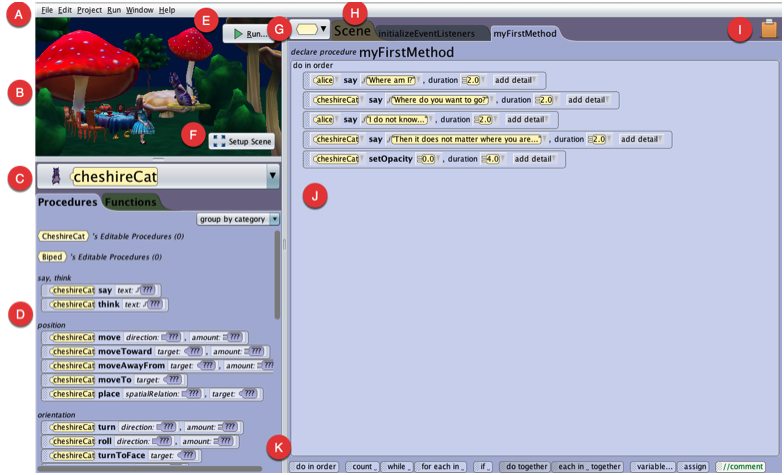
A. Menu Bar – Many menu items are typical of commonly used software applications and their operations are well-known There are Alice specific menu items for setting Preferences, managing project resources, and displaying project information.
B. Camera View – displays the Scene that has been built, corresponding to the Camera View setting in the Scene Editor. This view will also be the starting view point of the animation.
C. Object Menu – displays all the objects currently available to the programmer. It should be noted that the keyword this in the drop down menu refers to the Scene object.
D. Methods Panel – each tile represents a method of the object selected in the Object Menu that can be used in the Editor. A method is an action performed on or by an object (animal, person, prop, fish, or some other entity. The Methods panel categorizes methods for display on two tabs: Procedures (methods that perform an action), and Functions (methods that ask a question or compute a value).
E. Run button – Launches the runtime window and starts the animation
F. Setup Scene button – Opens the Alice Scene Editor for the creation of a virtual world by adding and arranging the objects in a scene
G. Class button – Lists all the editable classes of the different objects in project. This allows you to open up tabs for other classes in your Project, method tabs for those classes and add more methods and properties to those classes.
H. Class and Method tabs – There are 2 types of tabs differentiated by the color of the tabs. yellow tab indicates that you are viewing the information for the class identified in the text of the tab. The class tabs, when clicked on, displays all the methods and properties of the class. The purple tabs in the code editor are method tabs where sets of directions or code can be created. Whenever an Alice project is created or opened, Alice always opens the Scene class tab and two method tabs of the Scene class. The Scene class is where code creation for the project usually starts.
I. Clipboard – To copy, cut and paste code. To cut, use the mouse to drag a single graphic tile or a block of graphic tiles into the clipboard. The clipboard will turn white indicating something is on it. Once code has been stored on the clipboard, it can be pasted into any open tab in the Code editor. By default, dragging a graphic tile out of the clipboard removes the tile from the clipboard. To copy code (instead of cutting), press and hold the Ctrl key (the Option key on Mac) while using the mouse to drag the code into the clipboard. To paste code in more than one place, again press and hold the Ctrl key (the Option key on Mac) while using the mouse to drag the code into place.
J. Editor – This panel has tabbed panes with each tab representing different classes and method of the animation project. Here method and control tiles are dragged and dropped into place for the creation of program instructions (the script for the animation).
K. Controls Panel – In this panel, each tile represents a statement for managing instructions and data in program code. Most control tiles manage the order in which instructions (method statements) are performed. As an example, the do together tile is used to specify which instructions should be performed simultaneously. The //comment tile is used to create a statement that is NOT performed. Some tiles in the panel are for managing information (data). As an example, variable is used to set aside some memory space for holding data. The assign tile is used to create an instruction that stores data in a variable’s memory space.