
Importing your own models into Alice is a great way to learn about art pipelines and extend the visual gallery of Alice to help you create worlds out of your own imagination. This functionality requires that you use Alice 3.6 and newer.
* We will do our best but we make no guarantees that future versions of this build will not break worlds or invalidate models that have already been imported.
Models that you would like to import into Alice will require that you follow our requirements. We have chosen to support an open source file format so that we can accept files from a range of modeling applications. Alice does require that models have a texture to render which unfortunately means that a lot of easy applications for modeling intended for 3-D printers that export obj. formats will not work for this process (they do not need to worry about textures). We are working on creating a page to support easy unwrapping and texturing in blender of these files to help support these other applications. How to build models that will properly import has been included as a google doc in the useful links section to support continuous updates so check back often.
Import Model Requirements and Checklist
Importing Models
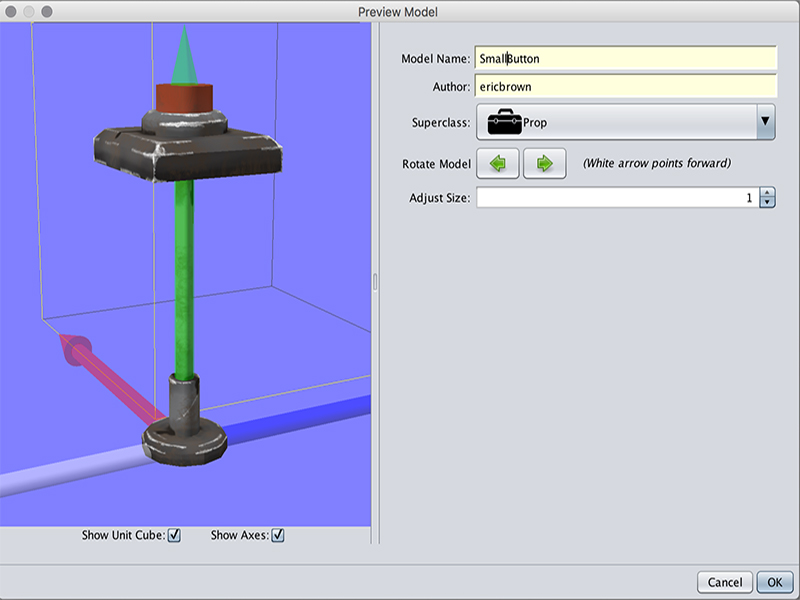
1. Select Import Model.. from the file drop down in Alice
2. Browse to the location of your .dae file (be sure the required texture file is linked)
3. The import model window should appear with a preview of your model
4. Name your model using camelCase (no spaces or special characters)
5. Select the class you would like the model to be a subclass of (prop, biped etc see below for status of available classes and reference the document for required joints for each type) *errors will show if you select a class that your model doesn’t adhere to
6. Use the rotate and adjust scale tools to reorient your model and resize it relative to the provided reference axes for forward and the 1 meter by 1 meter cube for size.
7. Select Ok
8. You can now find your new model in the chosen class section of the gallery and in the My Gallery tab
* If the name you want is taken by an older version of the model you can delete the model by navigating to the Alice 3 folder in your user directory and looking inside the My Gallery folder. Delete unwanted versions of models.
Sharing Your Models
To share worlds you create using custom models or for sharing your new Alice models you will need to share the imported model. Models you have imported into Alice will be saved in the Alice 3 folder where your saved files are located. It is by default in your user directory on the computer.
1. Navigate to your user directory on the computer
2. Open the My Gallery Folder
3. Zip up the whole folder with the name of model you want to share
4. Share this zip folder
5. The recipient will need to unzip the folder and place it in their My Gallery folder
* We are working on have custom models be bundled with Alice saves so that you will share your models with worlds that use them. If you are sharing .a3w files for use with the player or embedded in the player the models will go with the save.
Current Known Issues and New Features in Development
– Flyer and Slitherer classes are not supported for import due to the requirement of included arrays and poses
– Future development to include the ability to specify joints as built in arrays
– Future development to explore the ability to import poses or include a pose building tool in Alice
– Future development to include ability to support models with multiple texture resources
– Testing and detailing import process for other modeling applications
If you chose to help us with testing this new feature you can give us feedback through either of these channels:
– we will be receiving bugs from within Alice if the Angry Queen is encountered so please submit.
– You can also use our contact form to send us feedback (please select reporting a bug and specify the version of Alice 3 you have installed)