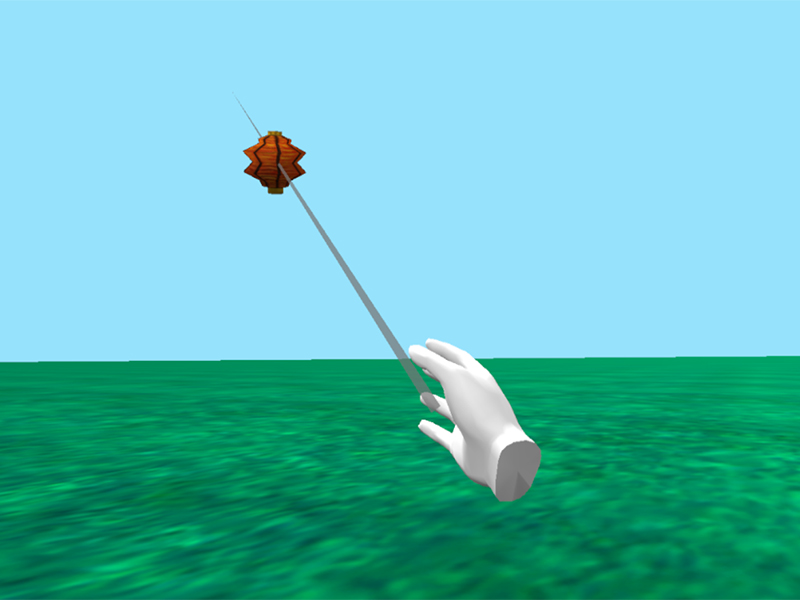
In VR limitations on a user’s ability to freely move around in space often call for using the point and click functionality to interact with objects that are out of reach and move them around in space to broaden the active play space for the player. This is especially true for VR experiences created for stationary VR. Think of this mechanic as giving the player a telescoping claw hand. Alice has two patterns that will support implementing this that will provide different functionality. We are working to extend existing functionality to enable more variety in how to build out this functionality for VR so check back.
Using the defaultModelManipulation
The fastest way to implement the ability to click and move objects is to use the mouse event defaultObjectMoveFor. This will enable the user to point and click on an object and drag it around the scene. This will constrain the movement of the object to the x,z plane (ground plane). You can limit the objects that can be manipulated this way by using the add details set of visuals to attach this functionality only to specific objects. (you will need the latest version of Alice to have this set of visuals detail exposed). To do this:
1. Go to the code editor
2. Navigate to the initializeEventListeners tab
3. Select add event listener > Mouse > addDefaultModelManipulation
4. To limit the objects that will trigger the event select add detail > Set of Visuals >Custom Array
5. Add the objects you want to be able to control with this event

Known limitation: Since this is a fully formed event listener you can’t set conditions on when it is active. This limits your ability to turn this on and off within your program. It also limits the movement to the ground plane. Future development may include adding a parameter for determining on which plane to move the object.
Take a look at vrObjectInteractionClickAndMoveDefault.a3p to see a world set up to use this functionality.
Creating a Custom Object Mover
A common interaction in vr is to allow the user to click and move an object by pointing and clicking with their hand and using the joystick to move the object closer to or further from the hand to allow movement of the object in all dimensions. Think of it like extending the claw hand to pick up and move an object. We are working on extending Alice 3 functionality to include a parameter for on click, on release, and possibly while pressed to make this easier to construct. Till then this will require you to use some advanced Alice constructs that we will walk you through now.
Setting up the object to track with the hand. For this we will construct code that on the first click will pick up the object and have it follow where the controller is pointed. On the second click it will put the object down so it will no longer follow the controller. The first step is to create a variable for tracking when the object is picked up and when it is put down.
1. Navigate to the scene tab of the code editor
2. Click Add Scene Property
3. Name it for the object you want it to control ie alicePickedUp
4. Set the value type to boolean since it will either be picked up (true) or not (false)
5. Initialize it to false so it starts off not picked up

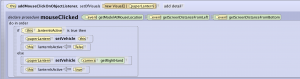
Next we will create the mouse event listener for when the object is clicked that will vehicle the object to your hand object causing it to track with the movement of your hand.
6. Create a mouse click on object listener
7. Add an if/else block to the event
8. For the boolean variable select the alicePickedUpVariable
9. The if variable is now functioning for when the picked up variable is true so we will add code to the if block that will put the object down
a. Select the object (Alice) and drag a set vehicle procedure into the if block and select “this”. This puts the object down so it will no longer follow the hand by setting the vehicle to the scene
b. We also want to set the variable to now reflect that we have put the object down by dragging an Assign block from the bottom control bar into the if block, select the objectPickedUp variable, and set the variable to false
10. The else function in this construct will trigger when the object is not picked up (picked up variable is false) so we want to set this condition to reflect the changes needed to pick up the object
a. Select the object (Alice) and drag a set vehicle procedure into the else block and select the small arrow next to the camera and select rightHandObject
b. We also want to set the variable to now reflect that we have picked up the object by dragging an Assign block from the bottom control bar into the else block, select the objectPickedUp variable, and set the variable to true
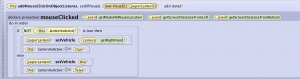
* The logic for this is inverted because the alicePickedUpVariable being true means that the first if represents the condition where pickedUp equals true (it is picked up). An alternate flow that is more easily read is to set the first if condition to (NOT alicePickedUp) which makes the if part of the block the condition trigger when the object is not picked up (the starting state). If you do this you can flip the reading so the if reads for when you pick up the object you set the variable to true and vehicle the object to the hand and the else outcome for when you click to put the object down by setting the variable to false and vehicling the object back to the scene removing it from the hand.
The object will now fly around following your hand when you pick it but will remain at the same distance from your hand as when you picked it up. Next we will implement functionality to allow you to use the joystick to move the object closer and further from your hand by using the arrow key event (remember these map to the joystick directions).
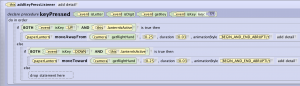
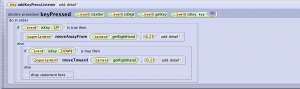
11. Select Add Event Listener > arrow key press listener
12. Add an if/else block to the listener
13. Drag the event is key function into the boolean value for the if statement and select the up arrow
14. Add a second if/else block into the else block of the first If/Else block
15. Drag the event is key function into the boolean value for the second if statement and select the down arrow
16. Select the object Alice in the object drop down
17. Drag the moveAwayFrom procedure into the if block and select the camera > rightHandObject and distance .25
18. Drag the moveToward procedure into the else block and select the camera > rightHandObject and distance .25
This will now move the object (Alice) toward and away from the hand object. It will do it all the time so we want to again make use of the alicePickedUp variable to make it only work when the object is picked up. To do this:
19. Select the drop down arrow next to the getKey function and select the both and add the variable pickedUp
20. Do this for the second if statement as well
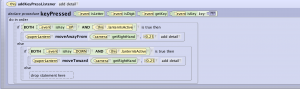
Now the movement will only function if the joystick is pushed up or down AND the object is currently picked up.
To smooth out the movement of the object towards and away from the hand we have set the duration for the movements to .03 and the animation style to Begin_And_End_Abruptly. For more detail on why we did this refer to the How to on VR Locomotion Direct Control.