
Alice in VR has opened up the ability for the user to use the controllers as hand objects. To support this functionality we have added objects under the camera that track to the location and orientation of the controller in VR. You can use these objects to directly interact with objects in the world by using them as objects in collision events to trigger interactions such as turning on a switch. You can vehicle objects to them to give the user tools such as drumsticks for playing instruments.
The Hand Object as a Child of the Camera
You will find the hand objects nested under the camera object in the extended list similar to where you find joints on jointed models. They are not available in all menus since they will move based on user input that should not be overridden with programmed movements.
Using the Hand Objects in a Collision Event
The simplest implementation of the hand objects uses the default view of the hands and creates a collision event for the hand and the desired object. To set this up do the following:
1. Add an object to the scene in a reachable distance to the camera
2. Go to the code editor
3. Select Add Event Listener
4. Select Position / Orientation
5. Select addCollisionStartListener and Custom Array A and Custom Array B
6. In the first custom array select add
7. Add the hand object(s) to the custom array
a. Select the little arrow next to the camera to then select rightHandObject
b. You can optionally add both hands if you want both to interact with the same object (this is done in the demo)
8. In the second array select add
9. Select the object you want the hand to interact with (shipwheel in the demo)
10. Add the procedures you want to occur when the collision occurs to the event (shipwheel turn 1 in the demo)
a. You can also create custom procedures to call from the listener
11. Test
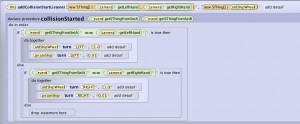
Check out the demo vrHandObjectscollision.a3p This demo has extended the basic use of collisions outlined above to add some moves to the outcomes and differentiated the outcome for the collisions of the left and right hands.
Adding Tools to the Hand Objects
It is also possible that you would want to attach items to the hands for the user to use. This can be done before the program starts in the scene editor or by creating code to pick up the object. First let’s add an object to the hand in the scene editor.
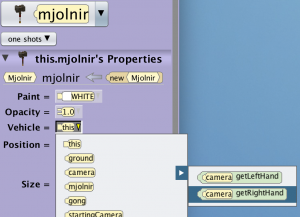
1. Add the desired tool to the scene (In our demo we put the mjolnir)
2. Use the one shot menu in the properties panel to select moveAndOrientTo and select the camera>rightHandObject
3. * We are working to add hand object representations in the IDE so you can then check the orientation and placement of the object relative to a representation of the hand outside of VR. Till that is done here are some options for knowing how it will be oriented:
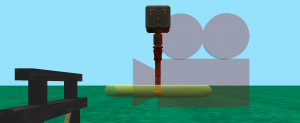
a. You can also set a camera marker at the start location and move the camera away from the camera marker and look back at it. In the demo file for this we have set up a camera marker to look back at the start camera marker. As of now the hand objects are located at the pivot point of the camera. In the representation of the camera marker this will be at the center point of where the camera lens meets the body of the camera. You can then move the object till you are happy with the placement. Before switching views to see our orientation you will need to remove the set vehicle on the mjolnir or it will follow the camera when you move it.
b. When using the move and orient to hand object the tool object’s pivot point will align with the center of the hand. You can use that knowledge to then adjust to match. Example: The mjolnir pivot point is at the bottom of the hammer. Using the move and orient to will align the very bottom of the mjolnir to the hand. To put it more firmly in the hand we moved the staff down slightly by adjusting the y value in the properties panel.
4. Set the vehicle of the tool object to the hand object. Be sure if you were looking back at the camera marker to first move the camera back to the starting camera before setting the vehicle.
5. Test
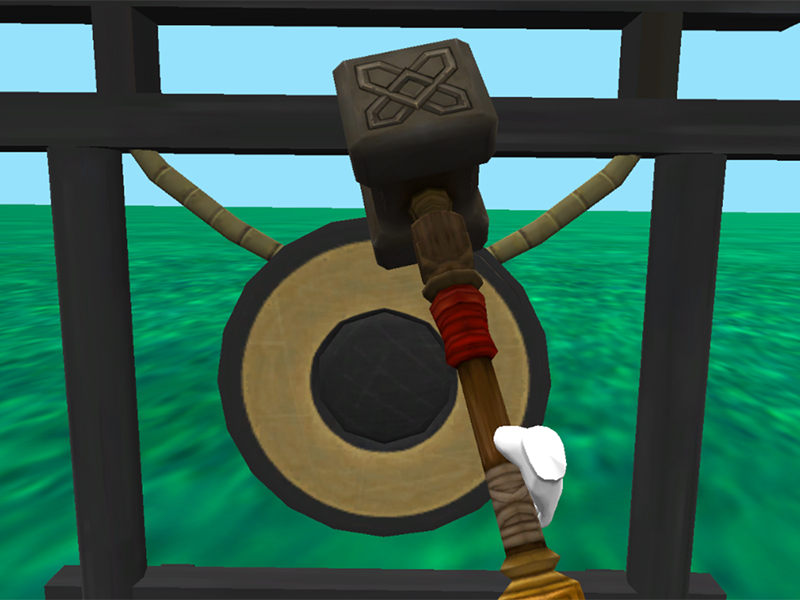
Check out the demo vrHandObjectSimple.a3p This demo attaches the mjolnir to the hand and allows you to use it to interact with the gong. Continue to the next section for how to set that up.
Using the Tool Attached to the Hand Object
Once you have added objects to the hand objects you can then easily use that object in collision events. The object will move with the hand but the item in the hand will determine the interaction. In this demo we use the mjoliner in the hand to strike the gong.
1.First you will need to either attach the object to the hand in the scene editor (above) or continue to the next section for how to code picking up an object
2. Create a collision event listener as outlined above for the object and the target object
3. Add procedures for the outcome of the collision

Check out the demo vrHandObjectSimple.a3p This demo attaches the mjolnir to the hand and allows you to use it to interact with the gong.
Picking Up A Tool
6. Add the desired tool to the scene in a place that the user can reach it in VR. This may take some testing and trial and error. Remember that units in Alice equal a meter (3ft) so setting an object any more than a meter from the user will probably be too far unless they have a play space that will allow them to move to it.
7. Go to the code editor
8. Select Add Event Listener
9. Select Position / Orientation
10. Select addCollisionStartListener
11. In the first custom array select add
12. Select the little arrow next to the camera to then select rightHandObject
a. You can optionally add both hands if you want both to interact with the same object (this is done in the demo)
13. In the second array select add
14. Select the object you want the hand to pick up
15. You will now want to move and orient the object to the desired orientation relative to the hand object and then attach it to the hand
a. Select the object and drag in a move and orient to and select camera > desired hand object
b. Select the vehicle procedure and drag it into the event and select camera > desired hand object
c. You may need to use more than just the move and orient to in order to have the object turned to the proper positioning relative to the hand object
d. You may also want to shorten the duration of the movements to have the object snap to the hand faster
16. If you have decided to have either hand work for the collision you can now drag in the getSThing from SetA and replace the hand object to allow it to work for whichever hand causes the collision
17. Test

View the demo vrHandObjectPickUp.a3p to view an example of the object being picked up by touching it. You will see we have added adjustments after the move to so that we could better position the hammer in the hand before vehicling. For another approach that allows you to pick up and put down an object you can mix and match parts of the patterns used in the How to Click and Move related to picking an object up and putting it down and the use of collisions. Think of examples where you use a button press to put the object down. Think about combining a conditional statement where you have to fulfill both colliding with the object and clicking the object.