Updated Nov 7th 2019
This tutorial exercise provides step-by-step directions for guiding you through designing and implementing a simple animation. Here you will explore the different methods that can be used for each step of the process as you follow along. This will provide an overview of the problem solving process and teach you the basic process to get you started designing implementing and iterating an animation in Alice.
You will need to access other printed materials or have access to the alice.org website to view the How To video content and resources called out within these materials. These materials can be downloaded and printed for offline use from Alice.org
Don’t forget to save your projects frequently.
Brainstorming
First you will need to decide what story you are telling. Here is a list of some great resources for using as a starting point to get the creative juices flowing:
– Characters singing your favorite song or animating a music video
– Characters telling jokes (ex. A knock knock joke)
– Your favorite internet meme
– Funny or sentimental eCards
– Existing comics strips and cartoons
– Even a serious conversation or event
1. Find a source for your story or come up with a story idea of your own.
It can be good to get feedback on your idea early. If you can find someone to “pitch” your idea to.
Write a Script and/or Draw a Storyboard

2. Create a script for your story or/
a. Be sure to describe the scenery
b. Detail out the actions and dialogue for your story
3. Draw a storyboard of your story
a. Create frames that highlight key actions in your story
b. Add comments to add detail if necessary
This is another great place to get feedback. Have someone look at your storyboard and give feedback. It is always easier to make changes before you start building the scene and programming.
Write an Algorithm Design and/or Flowchart
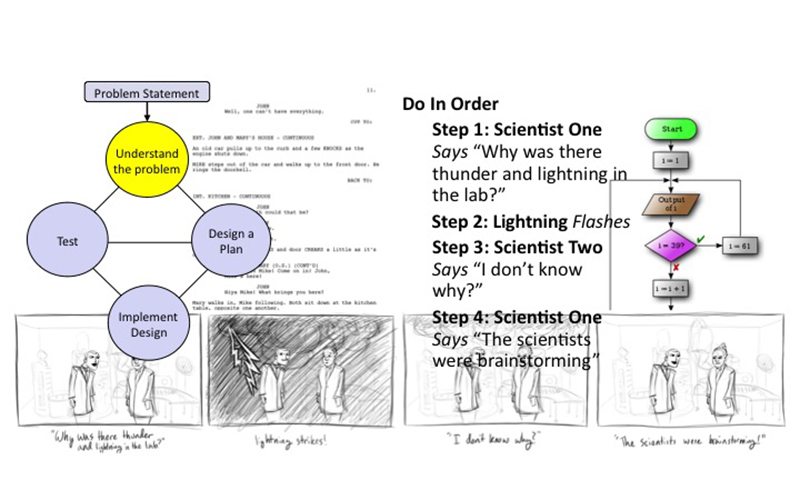
Next you will start to outline the specifics of your program through a textual algorithm design, a flowchart, or both. The algorithm for the above storyboard would look like this:
Do In Order
Scientist One Says “Why was there thunder and lightning in the lab?”
Do Together
Fog Fills room
Lightning Object Flashes
Lights flicker
Thunder sound plays
Scientist Two Says “I don’t know why?”
Scientist One Says “The scientists were brainstorming”
Camera Zooms in
Scientist Two Says “HAHAHAHAHAH”
4. Write out a step-by-step set of directions focusing on highlighting the objects or characters (nouns) in the story and the actions or events (verbs) that take place
a. Write out the objects or characters in the story and the actions or events that take place
b. Be sure to note what happens in order and what happens at the same time
c. Be as detailed as you need to be so that it is easy to see what you need to program
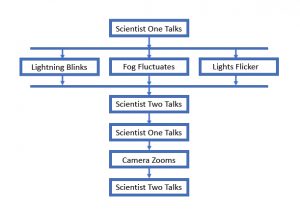
5. Diagram a flowchart of the events of your story giving each action a separate box
a. Connect the events or actions together in the order they occur with arrows if you need to represent multiple events happening at the same time you can do this by branching your arrows and bringing them back together
b. If you need more detail you can always expand each box and make a separate diagram to represent the action or event that make up that larger even so that you have more detail for planning your program
Plan Your Scene
Review your storyboard or script and make sure you have a list of all the locations, characters, and props you need to create your animation. If needed, draw a quick sketch of the scene to help plan for what you need to build.
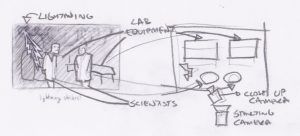
6. Read through your script and algorithm design and or flowchart and account for all of the scene descriptions, objects, and characters required to support your story
7. Review your storyboard, looking for scenery information, and read through your algorithm design and/or flowchart and account for all of the scene descriptions, objects, and characters required to support your story
8. Do a quick scene sketch or floor plan for locating and planning the scene construction.
Build Your Scene
It’s time to build your scene. Remember you are building the scene for the state that you want the world in at the beginning of your animation. For the following steps, you may wish to watch the How To videos or check the Quick Reference Guides for the Scene Editor Overview video and related Scene Editor How To video content.
9. Open Alice
10. Choose the location template theme for your scene
a. Don’t forget to save your world when you begin so that the autosave function will start just in case something happens
11. Navigate to the Scene Editor
12. Place your characters and props and set up your scene based on your design
a. Don’t forget to create a startingCamera camera marker before moving the camera around to build your scene
13. Save the project
Use Comments to Plan Your Program
Before starting to build your program, use comments from the control panel to outline what you want to create. For the following steps, you may wish to watch the How To videos or check the Quick Reference Guides for the Code Editor Overview video.
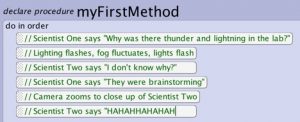
14. Navigate to the Code Editor
15. Drag comment blocks from the control panel into myFirstMethod
16. Outline your program based on your algorithm design creating separate comment blocks for each object and action to allow you to insert the code statements in between your comment blocks
17. Save the project
Program Your Animation
To program the actions and events that you have outline in your comments, use the Code Editor to add code statements to myFirstMethod. For the following steps, you may wish to watch the How To videos or check the Quick Reference Guides for the Code Editor Overview video and related Code Editor How To video content.
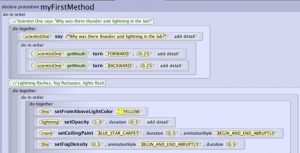
18. Build your program using the Code Editor
a. Insert code statements to build the actions that are outlined by your comments
b. Add, move, separate and remove comments, as needed, to enable you to build and document your animation
c. Don’t forget you can incrementally build your full story by working through small parts of the animation
d. Experiment with nesting do together and do in orders to get a set of movements that you like.
19. Save the project
Run Your Animation
Remember you can run and test your animation as often as you like. Skip to this step whenever you have built enough of your program that you want to see if it is behaving as desired.
20. Save the project. It’s a good idea to save the program before running in case a fatal error occurs. Alice is designed to avoid this but this is also a point where Alice can cause computers to freeze so it is better to be safe than sorry.
21. Run your animation and see if there are any problems with the output
a. You can disable sections of the code to only execute parts of the animation by right clicking and enabling and disabling.
b. You can also fast forward to areas of your code. This may be necessary if you are disabling code because objects and characters are not in the right place to execute later animations.
Iterate Till You Are Happy
The design process can be repeated as many times as you want until you are happy with your program. You can iterate through small components of the animation, adding more as you go and troubleshooting existing designs. Continue this process of defining the problem, thinking through the design solution, implementing your design, and then testing until you have completed your animation and are happy with the results.
22. Repeat previous steps until happy!


