
The Alice Player will now allow you to make your own standalone application from your favorite Alice world. We plan to make this even more seamless as we continue to integrate our new player into the core Alice IDE so check back in the future as this process will be updated. We are super excited about this new way to share your fully functional Alice creations. You will need to have at least the IDE and Player Beta Version 5 and higher to make a stand alone application.
The Alice Player
This process makes use of the Alice Player. To learn how to use and export worlds for use with the player review the Using the Alice Player and Exporting for The Alice Player How tos. You will need to have a .a3w version of your creation to complete this process.
Setting up the Alice Player to Autolaunch
Creating your application is going to re-purpose our player and make it uniquely yours. If you want to keep a version of the player for continued use you will want to make a separate copy of the player to use for this process. Always make sure you are using our latest and greatest versions. It is also important that the Alice IDE you export from is compatible with the player you are using.
The first thing we will do is copy your .a3w file into a directory inside of the application that will cause the player to skip the menu screen and automatically launch your project. This is done by adding your file to the streaming assets folder. The way that you access this will be different if you are creating a mac or pc executable. Just like us you will need to distribute a different version depending on who will be using it.
For PC
Adding your file to the PC executable is very easy since the PC application is an open file system.
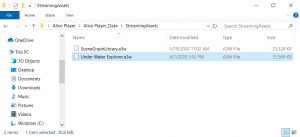
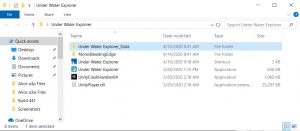
1. You will just need to navigate to the following directory: Alice Player > Alice Player_Data > Streaming Assets
2. Copy or drag your .a3w file into the folder (in this example our world is called Under Water Explorer.a3w. Do not delete the other file in that folder
3. Double click on the Alice Player.exe and you should see the loading screen launch you directly into your world!
For Mac
Adding your file to the Alice Player application is just as easy but requires one additional step to be able to navigate to the file directory since it is not by default exposed to the user.
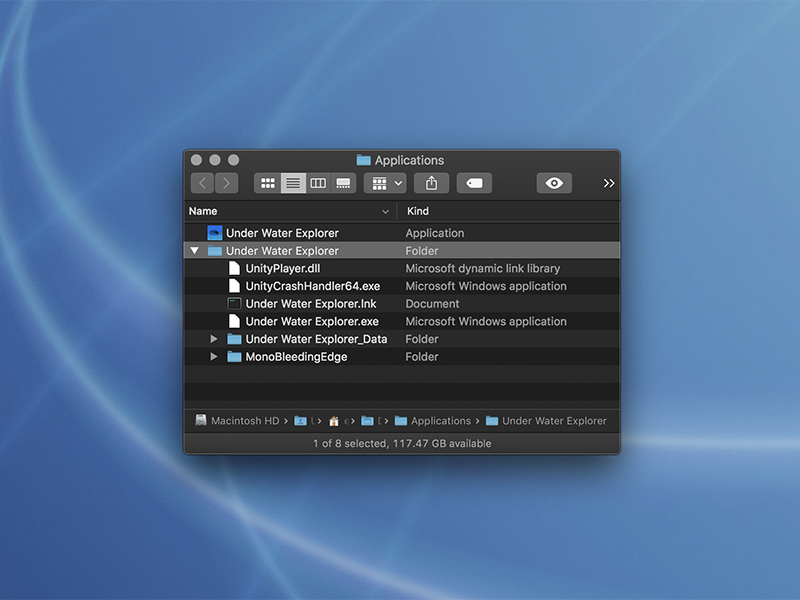
1. Right click on the Alice Player application and select Show Package Contents. You should now be able to see the underlying folder structure in the finder.

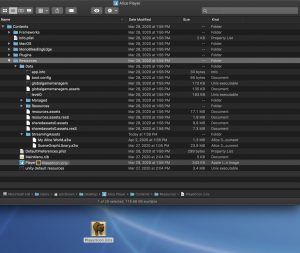
2. Navigate to Contents > Resources > Streaming Assets
3. Copy or drag your file into the folder. Do not delete the other file in that folder
. In the above image we have added My Alice World.a3w
4. Double Click on the Alice Player app icon and you should see the loading screen launch you directly into your world!
Adding Multiple Files
You can actually put multiple files into the folder and it will launch a simple menu screen for selecting which world to play. We are planning to make this menu more customizable and visually appealing in the future.
Renaming Your Player
Once you have the player launching your worlds you will want to customize the wrapper to reflect your world. There are a couple things you can do to make our player look and feel more like your own application. The easiest is simply to rename the application to your project’s name.
For PC
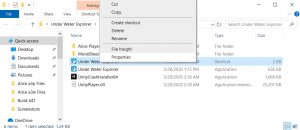
For the PC version you can rename the folder the application is sitting in and the .exe file inside to make it feel more like your own. You can do this by right clicking on the folder and the exe and selecting rename.
If you decide to rename the exe you will also need to rename the AlicePlayer_Data folder as well to match the name you set for the exe.
For Mac
For the Mac you only need to rename the application file by right clicking on the application and selecting rename.

Replacing the Application Icon
To really make the application look and feel like your world you will want to change the icon. Again this is a little different depending on the version.
For Mac
To replace the icon on a mac you will again need to navigate into the file directory inside the application and replace the icon file. You will need a .icns file of the proper size for this to work. See the next section for information on how to create this file type.
1. Right click on the Alice Player application and select Show Package Contents. You should now be able to see the underlying folder structure in the finder.
2. PlayerIcon.icns is the file you will be replacing. You will need to rename your .icns file PlayerIcon and replace the existing icon file in this folder
3. You may need to restart your computer to see the change to the icon on your computer
Look below for how to create a .icns file.
For PC
To replace the exe icon on PC you will need to use a third party option. We are not going to recommend a process but you can definitely look that up online. Here we will discuss another option that can be done without use of other software. To create new icons for PC you will need a copy of your desired icon in Microsoft Icon (.ico) file format. For information on how to create one look at the next section.
Another option that you can do without need of additional software is to create a custom shortcut to the Alice Player exe and change the icon on the shortcut. You will still see the Alice Player exe in the folder but you will have an icon of your choosing that will also start your world. To do this:
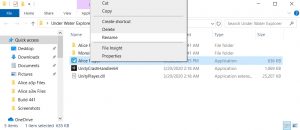
1. Right click the Alice Player exe and select create shortcut
2. Right click on the shortcut and select properties
3. Select the shortcut tab
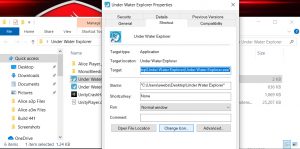
4. Select Change Icon…
5. Browse to the location of your .ico file and open. Select ok. Select Apply. Select Ok.
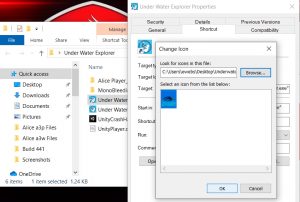
6. Your shortcut should now look like your icon
7. Double click on the shortcut to insure it opens your creation
You can now compress your PC application using right click > Send to > Compressed (zipped) Folder and you are ready to share it.
Creating a .ico and .icns file
PC and Mac require different file formats for images to be used as a desktop icon. Most image manipulation programs will have a way to create the necessary files. There are also several free online converters and third party apps that can do this for you. We will not recommend the best solution for this so please look online and choose the method that is easiest for you. Unfortunately the PC has no built in software that will do this but If you have access to a Mac there is a built in way to do this for both formats that we will outline here since it doesn’t require external resources. The same file size recommendations needed for this process are applicable for other methods.
Creating a .icns Using Preview
1. Open your desired image in Preview. Preview is the built in image viewer on a Mac and is able to create icon files.
2. You will need to use the cropping function to make your image a square. To do this:
a. Use the rectangular select tool and hold down shift to constrain it to a square and select the part of your image you want to be the icon
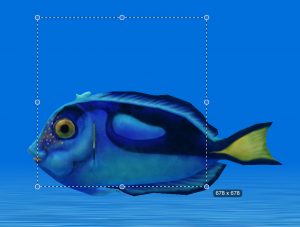
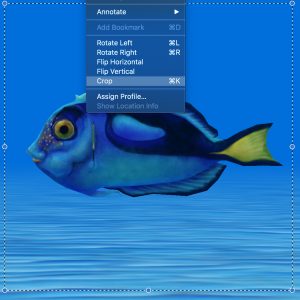
b. Select the tools drop down and then select crop
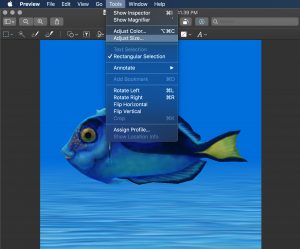
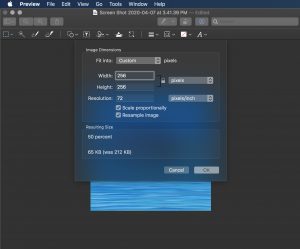
3. You will now need to resize your image. You can access this via the tools drop down and then Adjust Size…
4. Set the image to 512×512 pixels

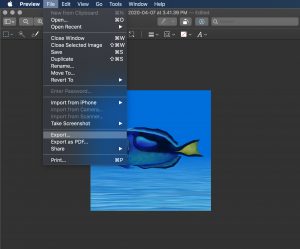
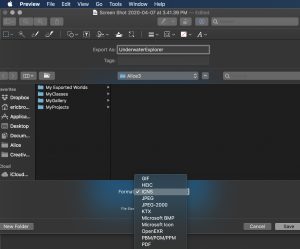
5. Select export from the file drop down
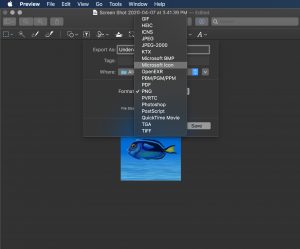
6. Hold down the option key and select the file type to be able to see the .icns format. If when you save the file it gives you an error double check your file size is 512×512 pixels
7. You should now have the file you need to insert in the Mac application
Creating a .ico Using Preview
1. Open your desired image in Preview. Preview is the built in image viewer on a Mac and is able to create icon files.
2. You will need to use the cropping function to make your image a square. To do this:
a. use the rectangular select tool and hold down shift to constrain it to a square and select the part of your image you want to be the icon (see images above)
b. Select the tools drop down and then select crop
3. You will now need to resize your image. You can access this via the tools drop down and then Adjust Size… You will need to set the image to 256×256 pixels
4. Select export from the file drop down (see image above)
5. Hold down the option key and select the file type to be able to see the Microsoft Icon format (which is the .ico format). If when you save the file it gives you an error double check your file size is 256×256 pixels
You should now have the file you need to insert in the PC application or shortcut