
The Alice player is a separate application that allows you to more easily share and run your Alice 3 creations. The player will work with Vive Desktop VR via the following method.
Setting Up The Alice Player
If you haven’t already installed and run the Alice Player please refer to the How to: Using the Alice Player to get the player up and running first.
Running the Player in VR
To have the player run in VR you need to first start the Steam desktop application and be sure you have Steam VR installed and running as well. Before you start the Alice Player be sure your VR headset and controllers are properly running. It is key that Steam VR is set up and running before you start up the Alice Player so that it will detect that VR is present.
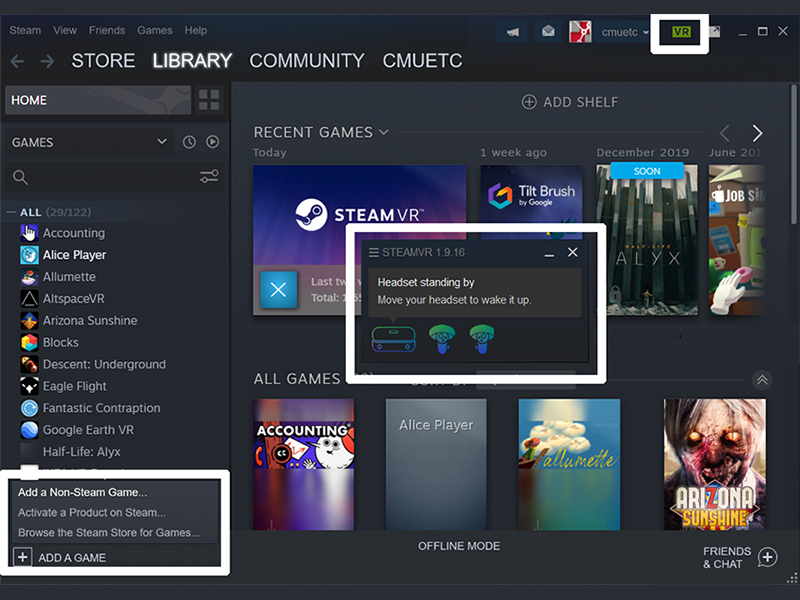
1. Start up Steam Application
2. Start Steam VR via the VR button on the top right of the Steam interface
3. Ensure that the set-up is properly configured and working and you are able to see and navigate the steam home space
4. Start up the Alice Player
5. You should now be able to put the headset on and see the Alice Player menu in VR
6. You can now run recent worlds. It will populate with all of the same recent worlds you should see when running on Desktop.
7. You can also load new worlds through the file browser in VR
Restarting the Player in VR
It is possible to add non Steam games to the Steam application. This will allow you to start the Alice Player from directly in the Steam Application. To do this:
1. Select the Add to Library
2. Select Add Non Steam Application
3. Select Browse to navigate to where you have the Alice Player application
4. Select the Alice Player
5. You will now see the application in your library
* If you end up with multiple versions of the player on your computer the library will only show versions that have you have added using the above method first. Ideally you should overwrite the version on your computer when you upgrade to a newer version.
Using the Player Controls
Once you have started playing a world in the player there are controls for the player that allow you to change the playback speed, restart the world, and return to the main menu to select a new world to play. To access these in Vive VR use the app menu button on the left controller. This will bring up the same buttons you see at the top of the screen on the desktop player but will be located down and in front of you similar to the Oculus home menu. The button similarly function to:
Pause: Stop playback till you then click the play button that will replace the pause button
Lower Playback Speed: Decrease the playback speed with each click
Increase Playback Speed: Speed up the playback speed with each click
Playback Speed Value: This will display the current playback speed in a numeric multiplier or by telling you the world is paused
Reload: This button allows you to reload and restart the world from the beginning
Main Menu: This button will take you back to the main menu screen to allow you to browse different worlds to play
* If the world isn’t performing how you are expecting be sure to check the playback speed as it may have been set before entering the world
Programming for VR Controllers
View the How tos on VR Programming to learn how to map Alice events to the Vive VR controllers.